

There is a particular kind of frustration that only people who love nail art know. You have seen the intricate florals, the fine lace, the crisp geometric lines, and you have tried to paint them freehand — only to end up with a wobbly flower and a smudge on your thumb. Stamping exists precisely for that moment. It lets you transfer a ready-made design onto your nail in seconds, with lines far finer than most of us could ever paint by hand.
And yet, plenty of first attempts at stamping go wrong. The image comes out patchy. Half the flower is missing. The stamper picks up nothing at all. The polish smears the moment top coat touches it. Almost every one of those failures has the same root cause: the technique is simple, but it is unforgiving about speed, pressure, and polish choice. Get those three things right, and stamping stops feeling like a gamble.
This guide is written for a true beginner. You do not need a steady hand, a salon background, or an expensive kit. You need a plate, a stamper, a scraper, the right kind of polish, and about an hour of unhurried practice. By the end, you will know exactly what to do, what to avoid, and how to fix the five mistakes that ruin most first attempts.
TL;DR — Stamping Nail Art at Home in One Minute
Paint your base colour and let it dry fully. Brush stamping polish over an etched design on a metal plate, scrape off the excess at a firm angle, and press a stamper straight down to lift the image. Roll the stamper gently over your nail to transfer it, clean up the edges, and seal with a light top coat. The three rules that matter most: use thick, opaque stamping polish (not regular polish), work quickly before the polish dries on the plate, and press straight down rather than rocking or dragging the stamper.
What Is Nail Stamping?
Nail stamping is a nail art technique in which a design etched into a metal plate is filled with polish, scraped clean, lifted with a soft stamper, and transferred onto the nail — like a rubber stamp for your manicure.
What Result Should You Expect From Your First Stamping Session?
Expect your first plate to look imperfect — and your tenth nail to look genuinely good. Stamping has a short learning curve, but it is a real one. Most beginners get a clean transfer on at least a few nails during their very first session, then spend the next session learning consistency: the same pressure, the same speed, the same angle, nail after nail. That is the whole game. Nobody stamps ten perfect nails on day one, and nobody needs to. Aim for a clean design on your accent nails first, then build up to a full set.
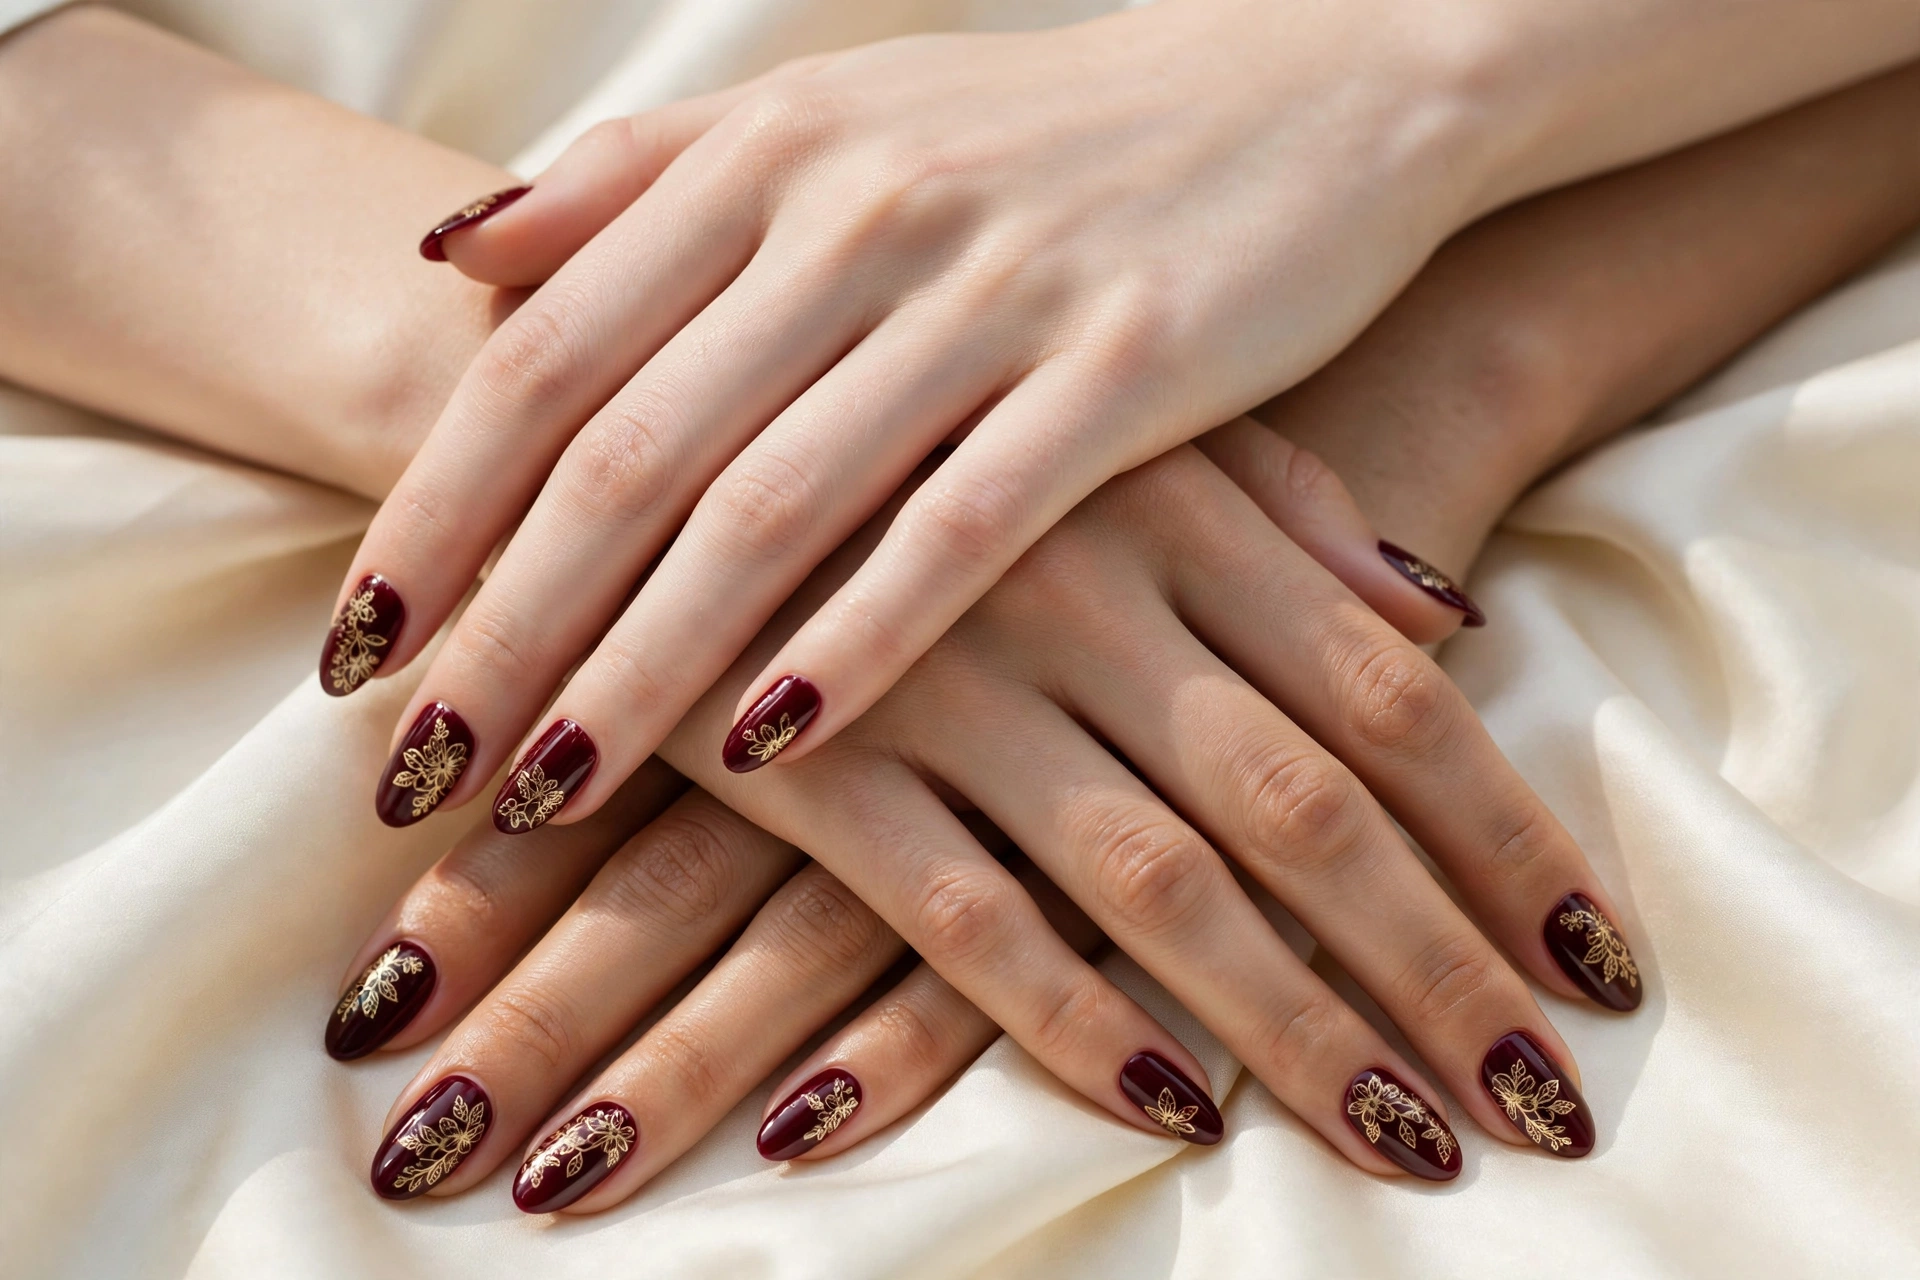
The look in this guide — gold floral lace over deep burgundy — is a good first project because it is forgiving. Fine lines hide small imperfections, metallic polish shows up beautifully on a dark base, and a floral pattern looks intentional even when it lands slightly off-centre. Save full-nail geometric grids and tiny lettering for your second or third session; they punish crooked placement far more harshly.
What Tools Do You Actually Need for Stamping Nail Art?
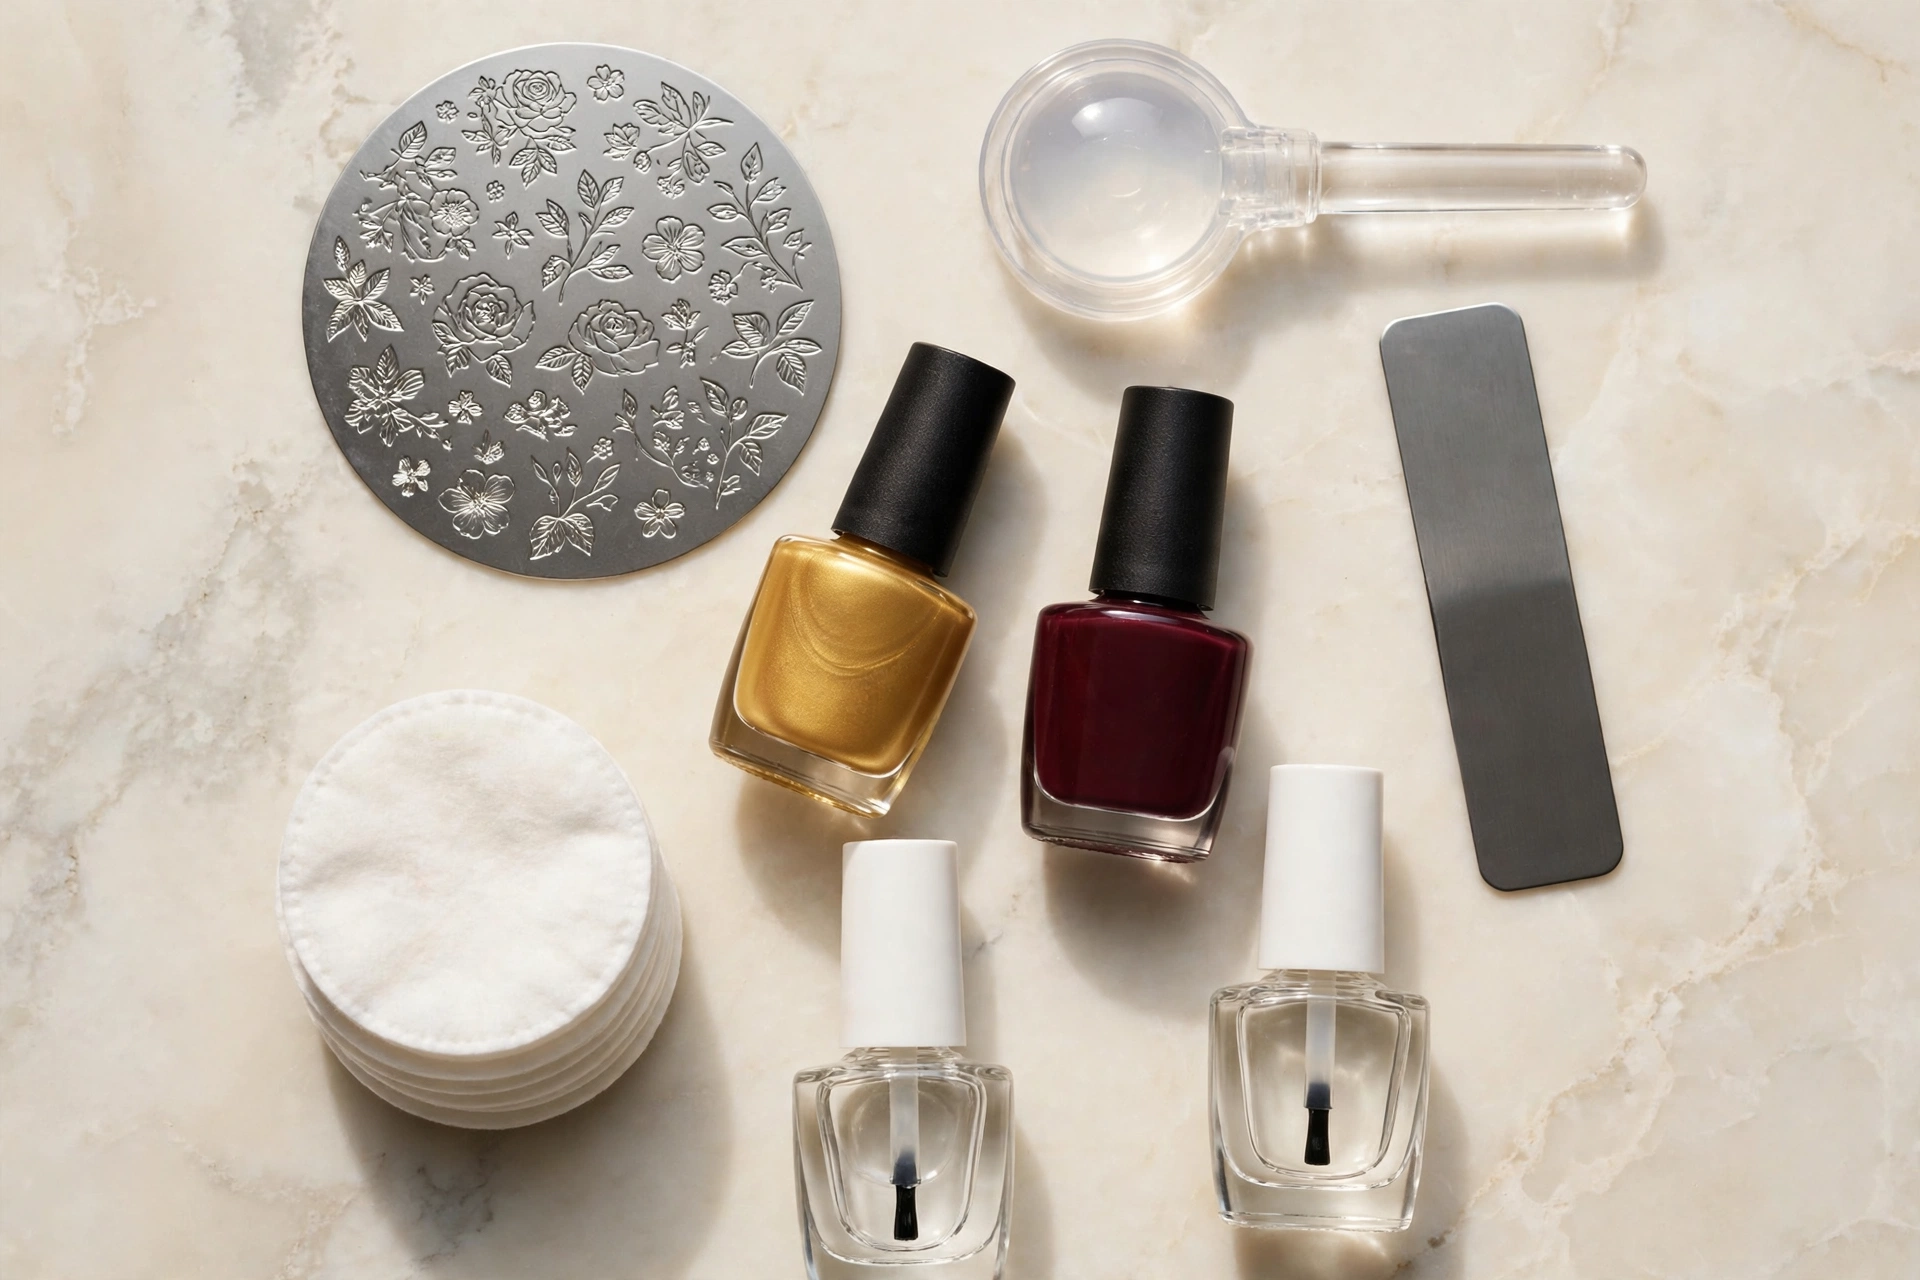
You do not need a drawer full of equipment. A basic stamping kit covers everything, and each piece has one job. Buying a kit is usually cheaper than buying the pieces separately, and it guarantees the stamper and scraper suit each other. Here is what to gather before you start:
- A stamping plate. A flat metal plate etched with designs. Start with a plate that has medium-sized florals and a few simple patterns — very fine lines are harder to pick up, and very large images are harder to place.
- A stamper. A soft, clear jelly stamper is the beginner-friendly choice because you can see through it and aim the design. Firm, opaque stampers work too, but aiming blind is needlessly hard at first.
- A scraper. Usually a stiff card or a metal scraper. It removes excess polish from the plate so only the etched lines hold polish.
- Stamping polish. Thick, highly opaque polish made for stamping. This is the one item you cannot substitute — regular polish is too thin and dries too slowly to transfer cleanly.
- Your base colour. Any regular polish you like. A dark or mid-tone base makes stamped designs pop; a pale base suits darker stamping colours.
- Base coat and top coat. Base coat protects the nail and gives the base colour something to grip. A quick-dry top coat seals the design — applied with a light hand, as you will see below.
- Polish remover and lint-free pads or cotton. For cleaning the plate and stamper between nails, and for tidying the skin around each nail.
- A small angled brush or a flat brush dipped in remover. For cleaning up polish that lands on the skin around the nail.
- Optional but helpful: a liquid latex barrier or a peel-off barrier around the nail, which makes cleanup much faster while you are still learning.
How Does Nail Stamping Actually Work?
The whole technique is four movements: fill, scrape, lift, and transfer. You brush polish over an etched design on the plate, which fills the tiny grooves. You scrape the surface clean, leaving polish only inside the grooves. You press the stamper straight down onto the plate, and the polish image sticks to the soft stamper head. Then you roll or press the stamper onto your nail, and the image moves from stamper to nail. A top coat seals it. The reason beginners struggle is rarely the idea — it is the timing. Stamping polish starts to set the moment it hits the plate, so each of those four movements needs to happen promptly, one after the other, without pausing to admire your work mid-way.
How Do You Prepare Your Nails Before Stamping?
Good stamping starts before the plate comes out. Shape your nails, gently push back your cuticles, and wash your hands so no lotion or oil sits on the nail surface — oil is the quiet enemy of both base colour and stamped designs, and it causes peeling later. Apply base coat and let it dry, then apply your base colour in two thin coats rather than one thick one, letting the first coat dry before the second. Thin coats dry harder and more evenly, which matters because you will be pressing a stamper onto them. Wait until the base colour is fully dry before stamping. This is the step impatient beginners skip, and it is the step that causes the most smudging: a stamper pressed onto a tacky base colour will dent it, lift it, or drag it sideways.
How to Do Stamping Nail Art at Home: The 11 Steps
Work through these steps one nail at a time. Do not try to stamp all ten nails from a single plate load — the polish dries on the plate too fast for that. One nail, one fresh load, every time.
- Choose your design and test it on paper first. Pick one medium-sized floral or pattern from your plate. Before touching your nails, do a practice transfer onto a piece of paper or a nail wheel. This tells you whether the design picks up cleanly and how much pressure your stamper needs.
- Paint a thick drop of stamping polish over the design. Brush one generous drop directly onto the etched image on the plate — enough to cover it completely. Do not paint it back and forth like regular polish; one or two passes is enough. A thin, patchy layer is the most common reason a design picks up incomplete.
- Scrape firmly at a steady angle. Hold the scraper at roughly 45 degrees and pull it across the plate in one firm, confident stroke. You want the surface of the plate clean, with polish remaining only in the etched grooves. Too gentle, and a film of polish stays on the surface and blurs the design. Too slow, and the polish starts to set before you lift it.
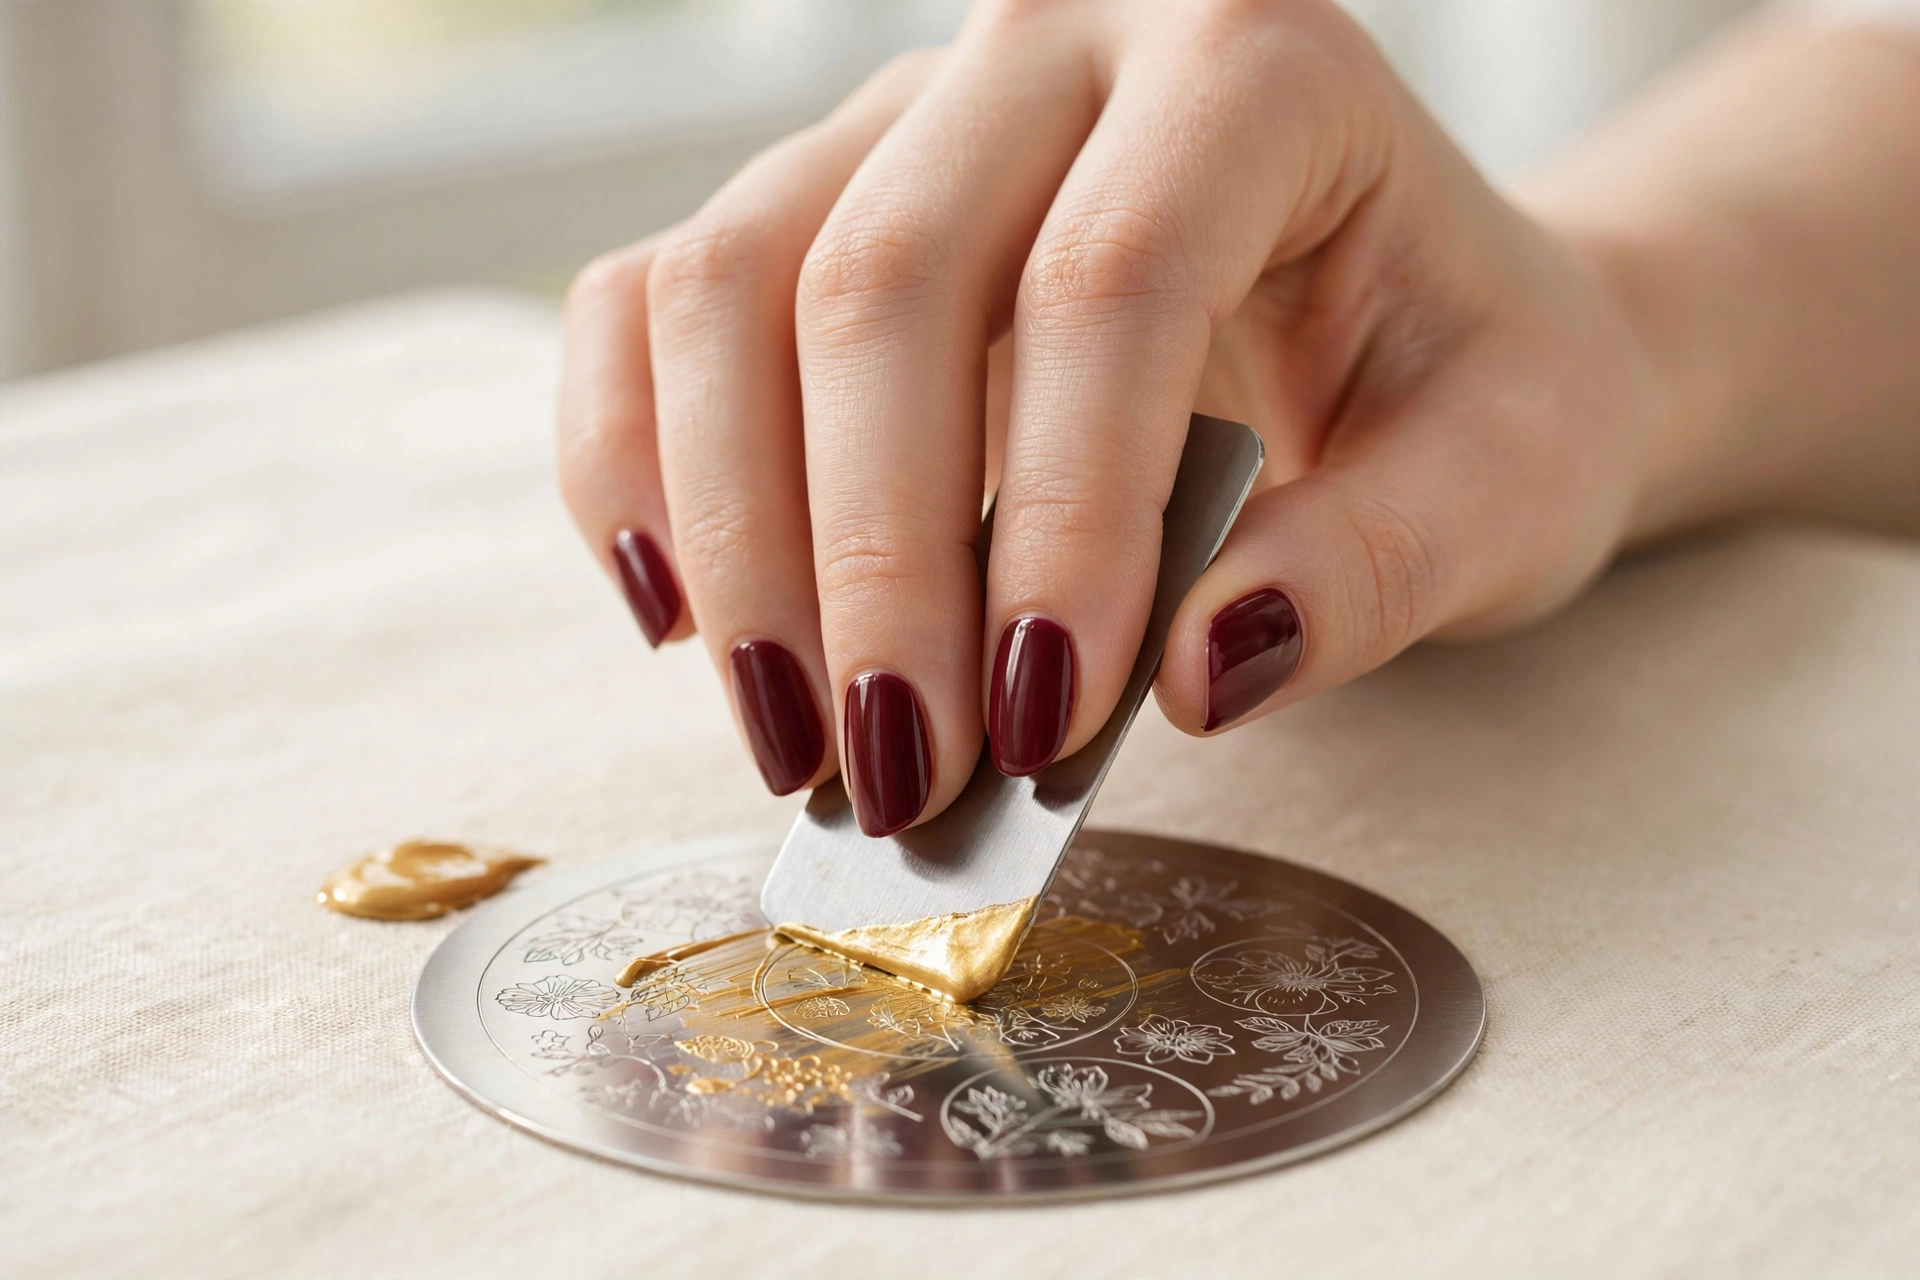
- Press the stamper straight down — no rocking. Immediately after scraping, press the stamper vertically onto the design with firm, even pressure, then lift it straight up. Do not roll it on the plate, rock it side to side, or press it twice. A single clean press gives the sharpest image; a second press almost always doubles or smears it.
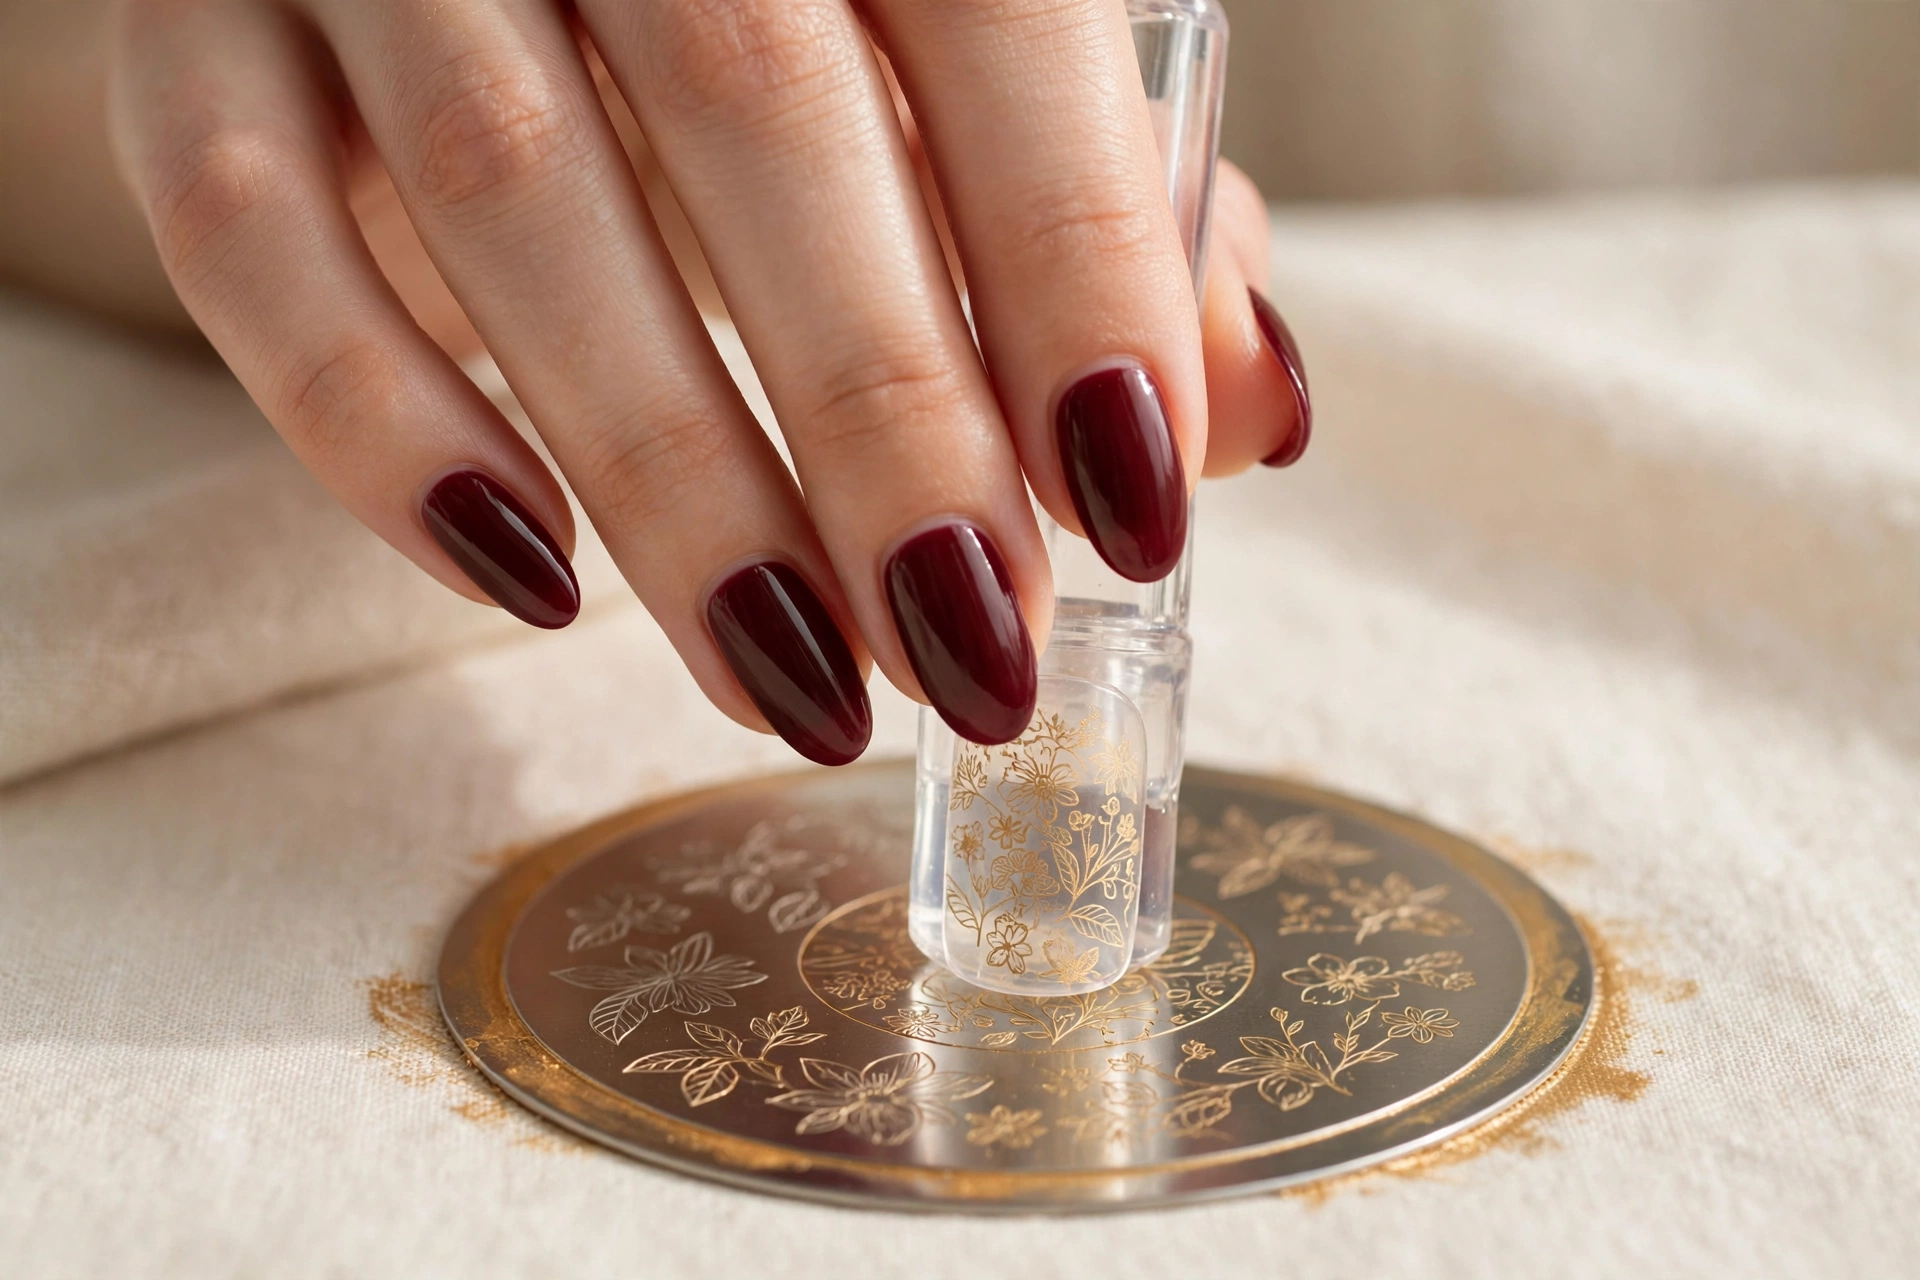
- Check the image on the stamper before it touches your nail. Look at the stamper head. If the design is complete and sharp, go ahead. If it is patchy, faded, or doubled, wipe the stamper clean and start again from step 2 — it is far easier to redo a plate load than to remove a bad transfer from your nail.
- Transfer with a gentle roll. Place one edge of the stamper on one side of your nail and roll it slowly across to the other side, with light, even pressure. The rolling motion helps the image follow the curve of the nail. Pressing straight down onto the nail also works for flatter nails, but rolling is more forgiving on curved ones.
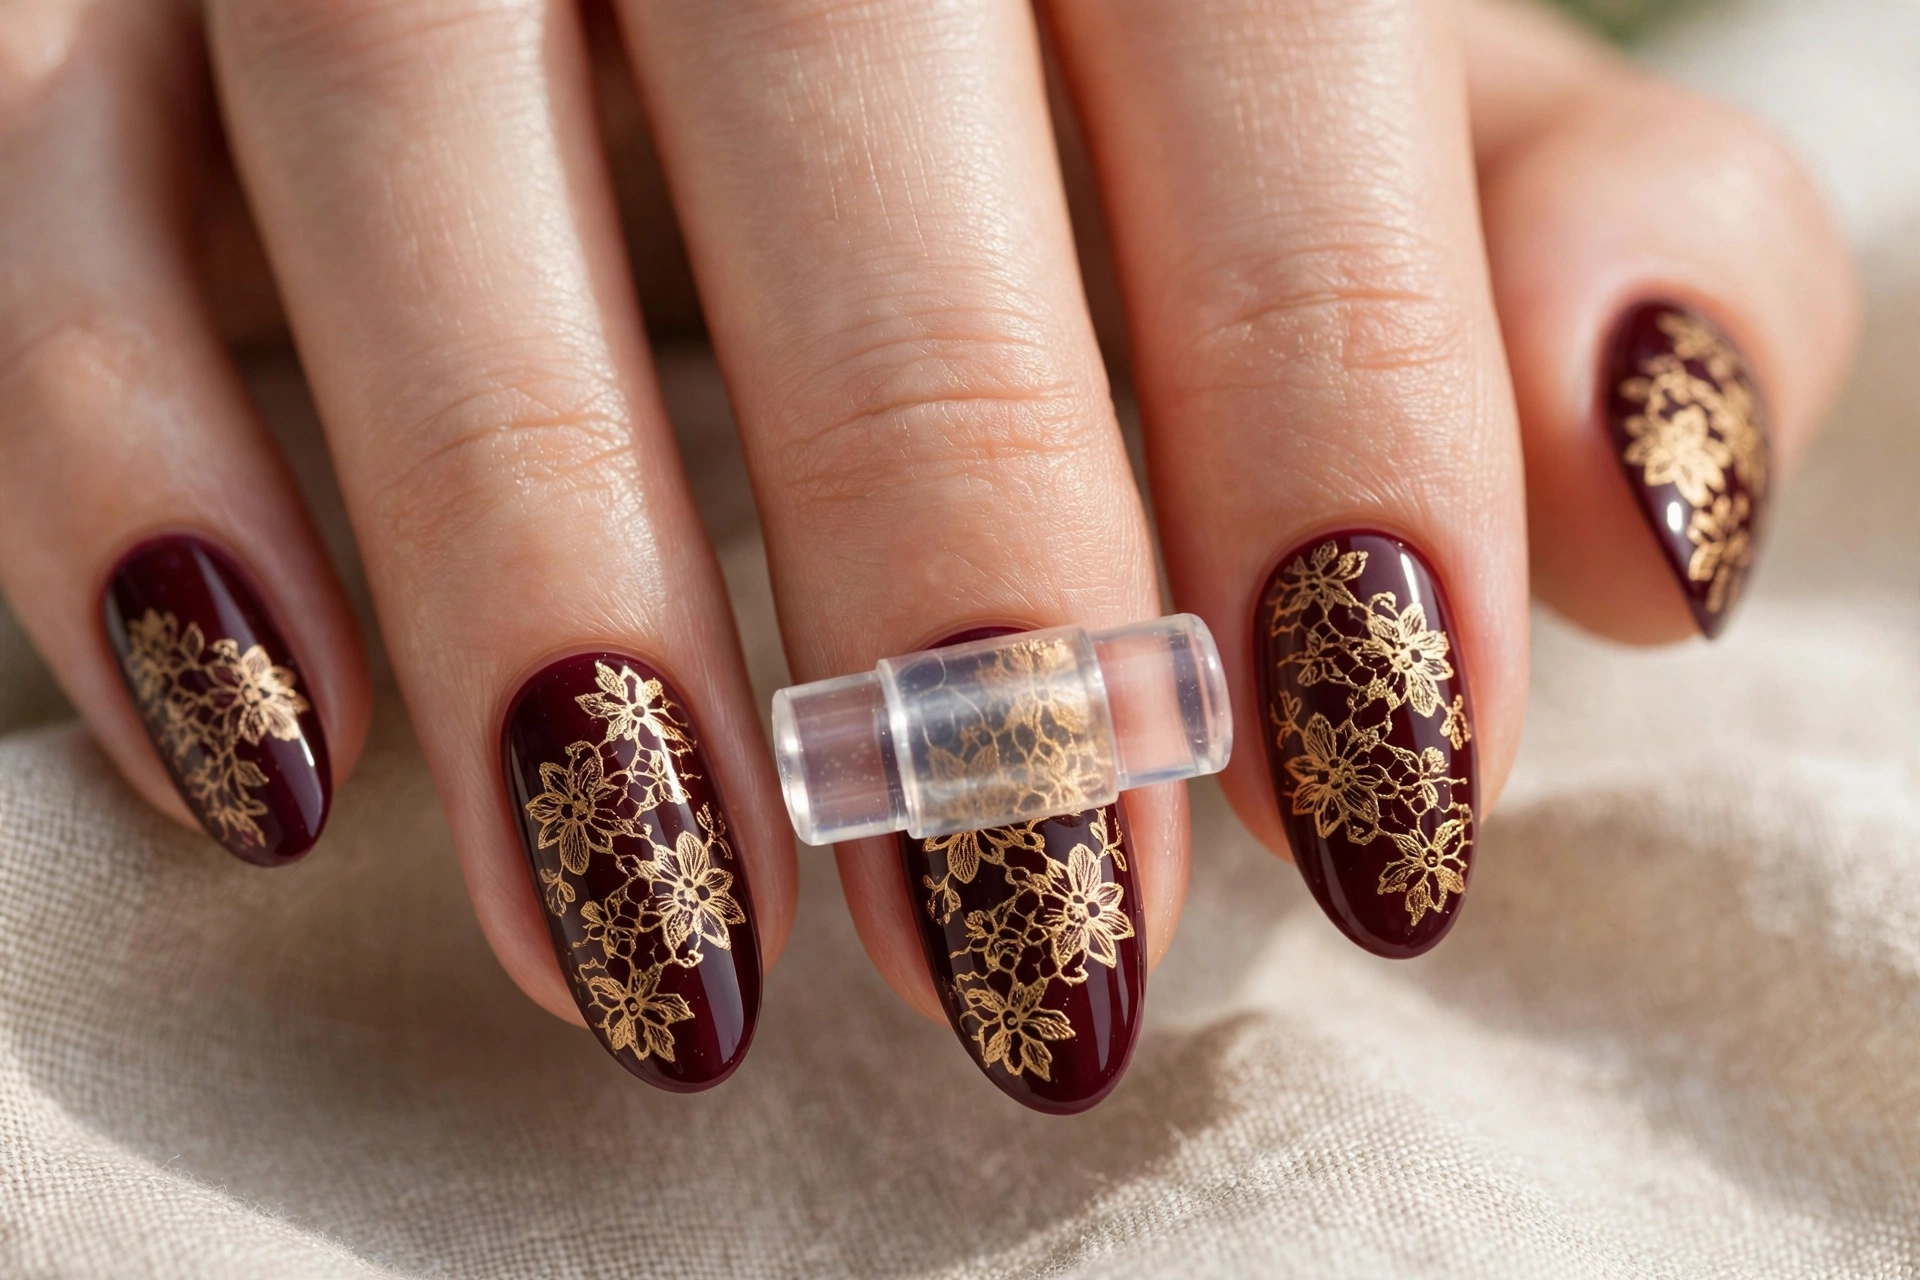
- Let the stamped layer dry before touching it. Give the transferred design a short while to set on the nail. It feels dry to a light touch fairly quickly, but resist the urge to poke it or start cleanup on that nail immediately — the image is fragile until it is sealed.
- Clean up the edges. Use a small brush dipped in polish remover, or a cotton pad wrapped around an orangewood stick, to remove any polish that landed on the skin around the nail. Work carefully around the design itself; one careless swipe across the nail will erase a corner of your pattern.
- Seal with top coat — lightly, and only once. This is where many first attempts fall apart. Load the brush with top coat and float it over the nail in a single smooth stroke, without pressing down or going back over the same area. Pressing or re-brushing drags the stamped polish and smears the design. If your top coat tends to smear stamping, try a water-based top coat or a no-smudge top coat made for nail art.
- Repeat one nail at a time, cleaning the plate between nails. Wipe the plate and stamper with remover on a lint-free pad before each new nail. Old polish residue on the plate fills the etchings unevenly and produces patchy transfers. Yes, this adds a minute per nail. It is the difference between a set that looks consistent and a set where three nails are perfect and the rest are a mystery.
- Finish with cuticle oil once everything is sealed. After the top coat is fully dry, massage a drop of cuticle oil into each cuticle. It will not disturb the sealed design, and it makes the whole manicure look finished rather than freshly worked-on.
How Long Does Stamping Nail Art Take?
For a full set of ten nails, allow about an hour to ninety minutes on your first few attempts, including base colour and drying time. The stamping itself takes only a few minutes per nail once you are in rhythm; what eats the time is setup, practice transfers, cleanup, and the plate cleaning between nails. With practice, many people get a full stamped set done in under an hour. Do not rush the first session. Speed comes from repetition, not from hurrying, and hurrying is exactly what causes smudged top coats and doubled images.
Which Colour Combinations Work Best for Beginners?
Contrast is your friend. The stamped design needs to stand out against the base colour, or all that fine detail disappears into the background. Gold over deep burgundy, white over navy, black over blush pink, and silver over forest green are all reliable starting points. Metallic stamping polishes are especially beginner-friendly because they are naturally opaque and show up well. If you love a subtle look, try a tone-on-tone combination — for example, a slightly darker shade of the same colour family stamped over your base — but save it for your second session, when your transfers are already consistent. A subtle design that transfers patchily just looks like a mistake; a bold design that transfers slightly imperfectly still looks like art.
Stamping vs Freehand vs Stickers: Which Should You Choose?
Each method has a genuine place, and the honest answer depends on what you value most: detail, originality, or speed. This comparison keeps it simple.
| Method | Best for | Skill needed | Detail level | Downsides |
|---|---|---|---|---|
| Stamping | Fine, repeatable designs like lace, florals, and geometry | Low to medium | Very high | Needs stamping polish; smudging risk with top coat |
| Freehand painting | Original, one-of-a-kind art | High | Depends on your hand | Slow; hard to repeat the same design on ten nails |
| Stickers / decals | Instant designs with zero technique | None | High, but fixed | Can lift at the edges; limited to the designs you buy |
Stamping sits in the sweet spot for most people: far more detailed than freehand for the average hand, and far more flexible than stickers, since one plate holds dozens of designs you can mix, layer, and recolour endlessly. If you already love freehand, stamping does not replace it — many experienced nail artists stamp a base pattern and then add freehand dots or lines on top. And if you are deciding between stamping and stickers, stamping wins on versatility alone: the same plate can give you a wedding-guest manicure one week and a festive set the next.
What Are the Most Common Stamping Mistakes — and How Do You Fix Them?
Nearly every stamping problem falls into one of five buckets. Find yours below, fix the cause, and your next transfer will already look better.
The image picks up patchy or incomplete
Usually the polish layer on the plate was too thin, the scrape was too gentle, or the plate was dirty. Use a generous drop of stamping polish, scrape firmly in one stroke, and clean the plate with remover before each nail. Also check that you are using genuine stamping polish — regular polish is the single most common cause of patchy pickups.
The stamper picks up nothing at all
Either the polish dried on the plate before you pressed the stamper, or the stamper head has a film on it. Work faster between scraping and pressing, and clean the stamper head with remover or a lint roller. New stampers sometimes have a residue from manufacturing; a gentle wash and full dry usually solves it.
The image doubles or looks smeared on the nail
You pressed twice, rocked the stamper, or moved it mid-transfer. One press on the plate, one roll on the nail, no second chances. If a transfer goes wrong on the nail, remove it and redo that nail rather than trying to stamp over it.
The design smears when top coat goes on
The top coat brush pressed too hard or went over the same spot twice. Float the top coat on in one light stroke. If the problem persists, switch to a top coat designed not to smudge nail art, and make sure the stamped layer is fully dry before sealing.
The design will not sit flat on a curved nail
Roll the stamper from one side of the nail to the other instead of pressing straight down, and use a soft, squishy stamper head that can flex around the curve. Very large, rigid designs struggle on very curved nails — choose a smaller motif for those nails and let it sit slightly off-centre rather than forcing it.
How Do You Seal and Protect a Stamped Manicure?
Sealing is a two-part job: the top coat protects the design, and your habits protect the top coat. Apply top coat as described above — one light, floating stroke — and let it dry fully before doing anything with your hands. Reapplying a fresh layer of top coat every two or three days keeps the design looking sharp for longer and guards the edges against chipping. Wear gloves for washing up and cleaning, and avoid using your nails as tools to open tins or scrape labels. Stamped designs are no more fragile than any other nail art once sealed, but the fine lines do show wear sooner than a plain colour, so a little care goes a long way.
How Do You Remove Stamped Nail Art Safely?
Removal is refreshingly simple: stamped designs made with regular polish come off with ordinary polish remover, just like any regular manicure. Soak a cotton pad in remover, hold it on the nail for a few moments, and wipe away gently. Do not peel, pick, or scrape the design off, and do not file the nail surface to remove it — both habits damage the nail and cause peeling later. If your base manicure uses gel products, follow the removal method recommended by the manufacturer of those products rather than improvising. After removal, wash your hands, apply cuticle oil, and give your nails a break before your next set if they feel dry or brittle. Healthy nails hold the next design better, so aftercare is not a luxury — it is part of the technique.
Five Beginner-Friendly Stamping Designs to Try First
Once the basic transfer feels comfortable, these five looks build your skills in a sensible order. Each one uses the same technique you have just learned, with one small new challenge.
- Gold lace over burgundy. The look in this guide. Forgiving, festive, and flattering — a perfect first full set.
- White florals over navy. Teaches you to work with a light stamping polish, which shows patchiness more honestly and improves your scraping.
- One accent nail per hand. Stamp only your ring fingers and leave the rest plain. A low-pressure way to practise placement without committing to ten transfers.
- French-tip stamping. Stamp a delicate border along the tip instead of a full-nail design. Excellent practice for precise placement.
- Layered stamping. Stamp a large, pale motif first, let it dry, then stamp a smaller, darker motif partly over it. This is how stamped manicures start to look truly custom.
How Does Stamping Fit With Other Nail Techniques You Already Know?
Stamping plays nicely with almost everything else in your nail routine. If you love a smooth, even base, the same careful base-colour habits that make a gradient manicure look good will serve you here too — thin coats, full drying time, no shortcuts. If you enjoy playful dot work, stamping pairs beautifully with it: try a stamped floral on most nails and a simple dot accent on one, following the same spirit as our polka dot tutorial. And if shine is your thing, a stamped design under a high-gloss top coat gives a similar jewel-like finish to the one in our chrome nails guide, without needing any special powders. Finally, if you want your stamped set to last as long as possible, the wear-and-care habits in our guide on making press-on nails last apply just as well to a stamped manicure — gentle handling and regular top coat refreshes are what keep any set looking fresh.
Frequently Asked Questions About Stamping Nail Art
Can you do stamping nail art with regular nail polish?
Regular polish can work in a pinch, but it is not recommended for beginners. Stamping polish is thicker and more opaque, which is what allows a fine etched design to transfer in one clean image. Regular polish tends to transfer patchily, dry at the wrong speed, and give faded results that frustrate first attempts.
Why is my stamper not picking up the design?
The most common causes are polish drying on the plate before pressing, a dirty or filmed stamper head, or using regular polish instead of stamping polish. Work quickly between scraping and pressing, clean the stamper head before each session, and test your technique on paper first to isolate the problem.
Do you need a special top coat for stamped nails?
You do not strictly need one, but a smudge-resistant or water-based top coat makes sealing much easier for beginners. Whatever top coat you use, apply it in one light, floating stroke without pressing down or re-brushing, since pressure and repeated strokes are what smear stamped designs.
How do you clean a stamping plate and stamper?
Wipe both with polish remover on a lint-free pad after each nail and at the end of every session. Avoid metal tools on the plate surface, since scratches fill with polish and show up in later transfers. Store plates dry and protected so the etched designs stay crisp.
Can beginners stamp on short nails?
Yes, short nails stamp beautifully — in fact, smaller designs often sit more neatly on a short nail. Choose medium or small motifs from your plate, centre them carefully, and let the design run slightly off the edge rather than shrinking it, which keeps the pattern looking intentional.
How long does stamped nail art last?
A stamped manicure sealed with top coat typically lasts as long as a regular manicure, with wear showing first at the tips and edges. Reapplying top coat every few days, wearing gloves for cleaning, and avoiding using nails as tools all help the design stay sharp for longer.